Cabinet refacing avoids the environmental waste and pollution associated with discarded cabinetry that ends up in landfills. Sacramento Cabinet Refacing also offers a happy medium for homeowners who want a like-new look without the expense and mess of a complete kitchen remodel.
Veneering is an advanced skill that requires training and experience to perform correctly. This is one factor that may extend project timelines.

Installation
Cabinet refacing can be an excellent option for updating the look of your home without incurring the cost and hassle of a full kitchen remodel. However, it can take a significant amount of time and patience to complete this project successfully. Whether you choose to reface your cabinets yourself or hire a contractor, here’s what to expect during the process.
Before refacing, you must clear out your cabinets and prepare the space for renovation. This includes removing dishes, cookware, and other items from your cabinets. Once your space is ready, it’s essential to communicate with your cabinet refacing team to establish a timeline that meets your needs.
A professional cabinet refacing company will provide you with a free consultation and design plan to help you visualize your new kitchen. They will also walk you through the cabinet refacing process and provide an estimate based on the materials you select. They will also work with you to schedule an installation date that works best for your busy life.
Cabinet refacing is less expensive than a total kitchen remodel and can be completed in less than half the time. Additionally, it’s an eco-friendly alternative to cabinet replacement since your existing cabinets will be reused rather than discarded and sent to the landfill.
It’s important to consider the durability of your selected materials, as well as your overall budget. While solid wood may be more expensive than laminate or composite, it will last much longer and is less prone to warping or hardware deterioration.
Once your cabinet refacing is complete, it’s time to install the new doors and drawer fronts. This is the final step in the process and typically takes 1-3 days to complete.
While installing your new cabinet hardware, be sure to keep your hands and tools clean to avoid fingerprints and smudges. When the job is finished, you can enjoy your new kitchen!
Cabinet refacing can be an excellent way to update your home’s appearance and increase its value without spending a fortune. It’s a quick and easy way to give your kitchen a fresh, updated style that will be the envy of your friends and family. Unlike a kitchen remodel, cabinet refacing doesn’t require any demolition or major construction, so it won’t disrupt your daily routine or add stress to your life. With the right planning and preparation, you can get your dream kitchen at a fraction of the cost.
Preparation
Cabinet refacing is not a DIY project that you can just jump into without proper training. The process is intricate and requires a high level of skill that most homeowners do not possess. In addition, it’s important to have the right materials for a quality finish. This is why hiring a professional is essential. Professionals can also take into consideration the specific needs of your kitchen, which can impact the length of time it will take to complete your project.
The cabinet refacing process can be completed within 3 to 5 days, but the exact duration depends on the extent of your remodeling plan. The first step is to remove the old cabinet doors and drawer fronts, which may require a bit of careful work to avoid damage to the existing cabinet boxes. Once the cabinets are ready, the team will take accurate measurements to ensure that all new components fit properly and seamlessly.
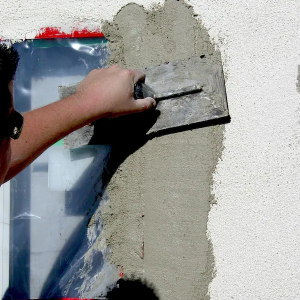
Next, the cabinet surfaces are sanded and prepared. This is a crucial phase that can affect the final appearance and durability of your new cabinets. Once the cabinets are sanded and primed, they will be ready for installation. The refacing professionals will install the new cabinet doors and drawer fronts, as well as any additional features that you’ve chosen. Once the installation is complete, the hardware is installed, and a final inspection is conducted to ensure that your cabinets meet your expectations.
Cabinet refacing offers several advantages over other remodeling options, including faster completion and cost-efficiency. However, it is not a suitable option for all homeowners and should only be considered if your cabinets are in good condition structurally but need a refresh in style. If your cabinets are warped or damaged, it may be more beneficial to invest in a full remodel.
Finishing
Cabinet refacing is an attractive option for homeowners seeking to update their kitchens without the expense, mess, and inconvenience of a full renovation. With a little planning and the help of a professional, this type of home improvement project can take less time to complete than a full replacement, and it can be significantly cheaper.
The duration of a refacing project depends on several factors, including the size of the space and the condition of the existing cabinets. Larger kitchens with more cabinet boxes and those requiring extensive repairs will naturally require more time than smaller spaces in good condition. Also, more intricate door styles and the use of special techniques like antiquing can add to the overall timeline.
Another factor is the quality of the cabinet refacing materials. Solid wood offers exceptional durability, and it will stand up to years of wear and tear much better than engineered veneer. Solid wood is also a more expensive material than the less durable options, but the added longevity may be worth the extra investment.
It’s important to select a skilled and reputable cabinet refacing service provider for your project. Check online reviews and testimonials to get a feel for the company’s reputation and track record. It’s also wise to inquire about a warranty for both the workmanship and the materials used in your project.
Before the refacing work begins, it’s necessary to clear out and remove any dishes or cookware from your cabinets. Then, the old cabinet boxes must be thoroughly cleaned to ensure they’re ready for the new veneer and other finishing materials to be applied. It’s also vital to take this opportunity to inspect the quality of the existing cabinets. If they’re in poor condition, a full replacement is probably the best course of action.
If your cabinets are still in relatively good shape but you’re looking for a more drastic aesthetic change, painting or staining may be more suitable options than refacing. But if you’re determined to give your cabinets a fresh look, cabinet refacing offers the best compromise between affordability and durability.